Wooden Holiday Décor - Three Quick and Easy DIY Projects
The holiday season is officially upon us. As we begin to deck the halls one way we can personalize and make our homes more unique is by creating your own holiday décor. A quick and easy project is cutting out and painting wooden shapes. You can keep it as simple or as complex as you want and even get the kids involved. Here are three different examples of projects that can be completed in under an hour.
Tools, Supplies & Materials Used:
Tools: Cricut; Miter Saw, Band Saw / Scroll Saw, and Orbital Sander
Supplies: Printer Paper & Pen, Stencil Vinyl, Painters Tape / Contact Paper, Sand Paper, and Paint Brushes
Materials:
1x6 Board - Approximately 20” for the Tree & Reindeer (Varies by Design)
1x4 Board - Approximately 12” for Snow (Varies by Design)
Paint - Color of your Choice
First: Create Your Design
Festive Words:
Decide what festive holiday word you want to feature - I have used SNOW, NOEL and JOY for projects this winter.

For this example I will be using “SNOW”
First: pick a font and snowflake
Second: Size the text - I use either 3.5” or 5.5” tall to fit on a 1 x 4 or 1 x 6.
I have a Cricut that I use to draw my templates, but could also size and print out on a printer.
In design space I then create a box that is the same size as my design that I set to cut. I then make my design a pen line drawing. I then center the design with the rectangle and attach them. This means that the Cricut will draw my design then cut out the rectangle around it. I draw and cut my templates on just plain printer paper - you don’t need to use anything special.
3D Wooden Tree:
used my Cricut to create my design. You can also draw on a tree of your choice - then measure with a ruler to add the slots.
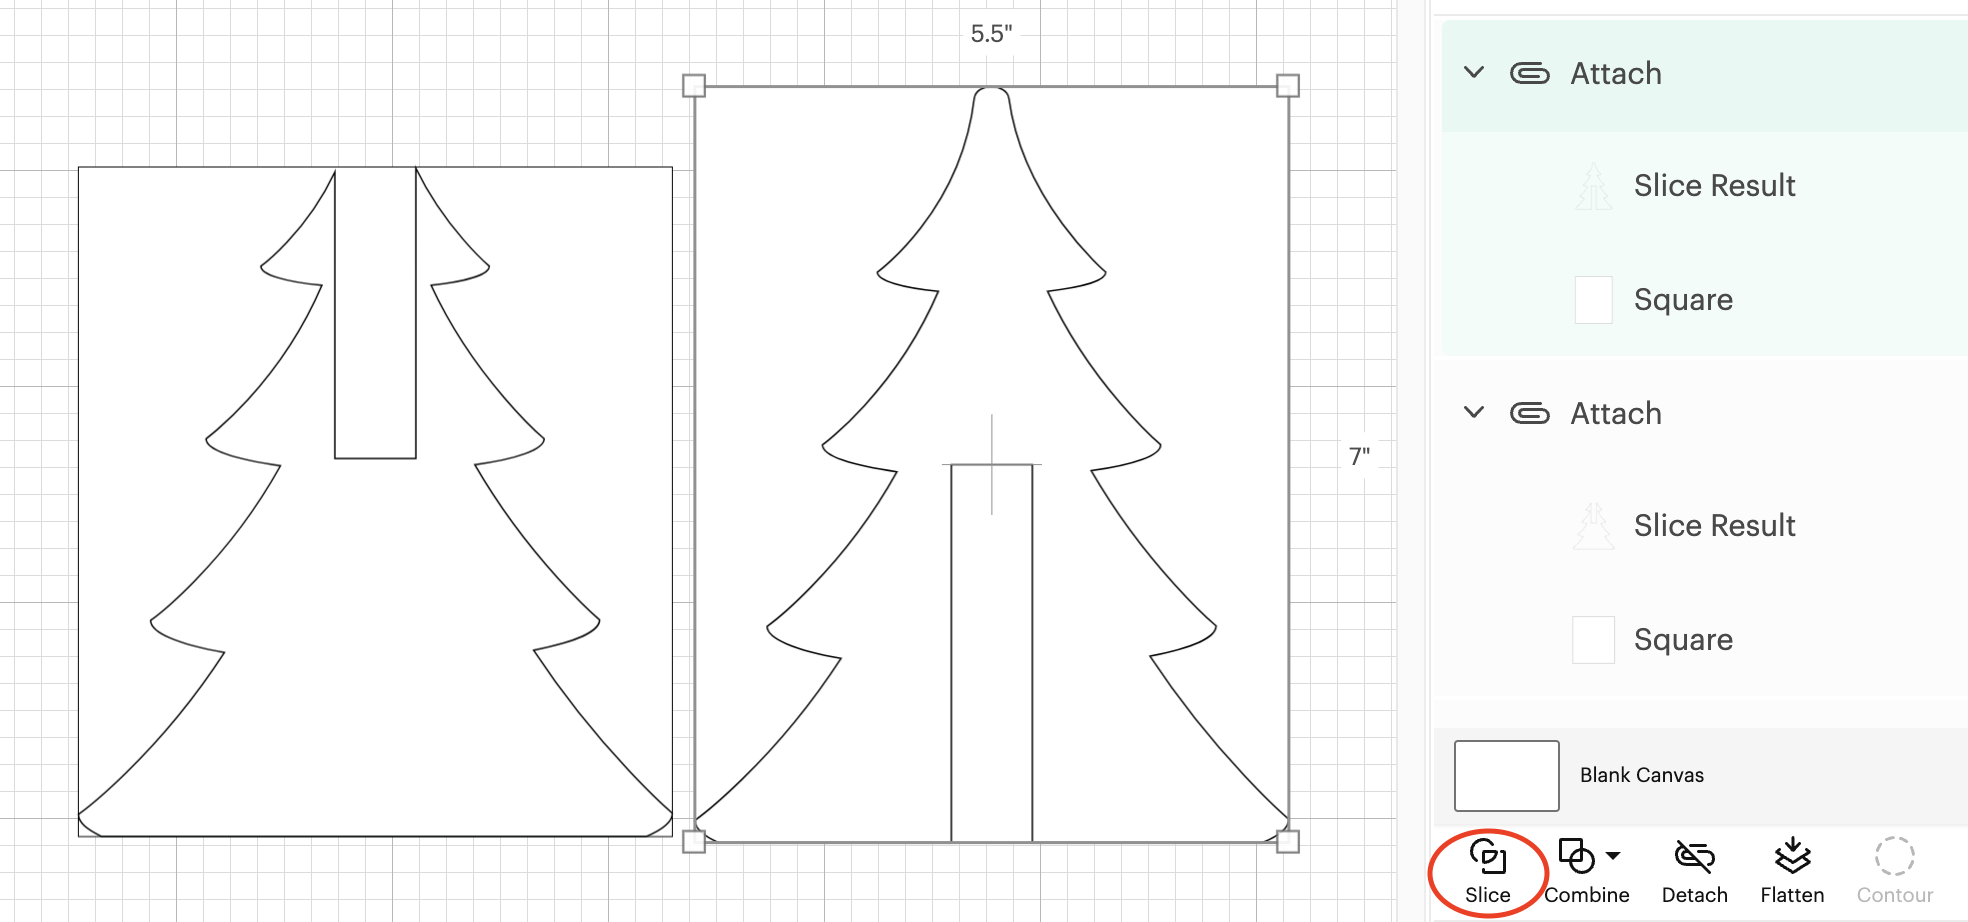
I found a tree I liked - I did use the slice function in Design Space to remove the base of the tree to make it have a flat bottom. If you find a tree you life with a flat bottom, you would not need to complete this step.

Next - I sized the tree to be 5.5” Wide x 7” tall.
I then copied & pasted so there are two trees
To create my slots for the trees - I made two triangles that were 0.75” (Wood Depth) by 3.5” (1/2 Tree Height)
Next I aligned the squares on trees. I used the align function to make sure they were centered and the top and bottom of each tree.
I then again used the slice function to remove this section of the design. I have circled the slice function in the image below.
I then used the same process as above to draw and cut my templates.
Simple Reindeer with Stenciled Snowflake:
Decide what festive holiday shape you want to feature - I have done trees, presents, Santa hats, snowman, penguin and reindeers to name a few.

For this example I will be using a reindeer that I want to add a design to.
1st I sized my reindeer to 5.5” wide to fit on a 1x6 board.
I then picked out a snowflake and sized it to fit on my reindeer.
I then created a stencil - I created a squire that was a bit bigger then the snowflake and used the slice function - as I did above for the trees.
I did take it an extra step and sliced the square with the reindeer to make aligning easier when it is time to add the design.
For my stencil - I use stencil vinyl. You can also use removable vinyl - the color doesn’t matter since we will just be removing and disposing of it. I finished creating my template using the same steps as in project one and then cut my stencil. Make sure the stencil is a different color so that it is on a separate mat for your vinyl vs printer paper.

Second:
Cut Base Pieces
This is an easy step – I got my board and cut the length I needed on my miter saw. I do write the measurements down on my templates so it is easer to quickly remember how long each board needs to be. I make sure to line it up correctly with the line and remember to keep your fingers away from the blade.

Third: Apply your template
First, I need to add something to my wood to protect it from the glue. I use either painter’s tape or removeable contact paper. I d this so the spray adhesive doesn’t get onto the wood which makes sanding quicker.
Next, I spray the back of my template with spray adhesive. I would do so on cardboard or something you don’t care if it gets sticky from the over spray. I also prefer the Loctite – for me – I feel the gorilla glue nozzles clog up faster.
I then line up and place my stencil to the piece of wood.
Fourth: Cut out shapes
It is now time to cut the wood – I have both a bandsaw and a scroll saw and either work. The bandsaw cuts faster but it is not as clean, and the cutting radius is much larger. I will sometimes do the bigger easier cuts on the bandsaw then switch to the scroll saw for the finer cuts. Remember to go slow, back up and do you best to stay on your lines. For the 3D Tree I started by cutting the slots. To help keep them straight I used the fence on my bandsaw as a guide. Once the slots were cut I continued on cutting the rest of the trees shape.
Once done cutting, I remove the template from my wood.


Fifth: Sanding
I start off with the orbital sander to smooth out the wood – this isn’t too rough so I will start with a 180 grit then a 220 grit. Then for the edges, I can use a small sanding mouse and sanding twigs to get in the tight spots.
Sixth: Paint
Now it’s time to decorate! First, I wipe off excess dust to make sure I can get a clean finish. Then pick your color and have fun decorating!
Reindeer: The difference with this step is I decided to stencil a snowflake on my reindeer. Once I paint the base coat and let it dry I can apply my stencil I cut out with my Cricut. You can also paint on a snowflake or other design of your choice.
Stencil Trick: To help eliminate the paint bleeding under the stencil, you can apply a light coat of the base color or some Mod Podge first then paint the second color. The other color or Mod Podge will bleed but not be visible and help seal under the stencil.

Summary: Time & Cost
Supplies: $1.05 - Value Used
Stencil Vinyl ~ I used a crap piece but only about $0.05 worth of a roll
Painters Tape or Removeable Contact Paper ~ I used about $0.50 worth of a roll of painters tape
Sand Paper - 180 & 220 Grit ~ Discs are about $0.5 each and I used two, but there is more life so I will assign $0.50 worth.
Paint Brushes ~ These are Reusable
Materials: $3.70
1x6 Board - Approximately 20” for the Tree & Reindeer (Varies by Design). A 3’ Board is $3.70 - So about $2.05
1x4 Board - Approximately 12” for Snow (Varies by Design). A 3’ Board is $3.00 - So about $1.00
Paint - Color of your Choice. This varies by brand, number of coats and if you need to purchase a special color for the project. I am estimating $0.65 for the paint that I used to create these.
Estimated Total Cost (Supplies/Materials Used): $4.75 for all three projects.
Note: I was able to use materials that I had on hand so no additional supplies needed to be purchased.

Estimated Time Needed:
The time spent during each phase may vary depending on skill level
With set-up and clean up each project should take <1 hour, if a simplified snowflake is used the time on SNOW cutting and painted can be reduced.
Share Your Creation!
The possibilities are endless. I am excited to see what other have created so I created a group where you can share the projects that you have created.
Facebook Group: Click Here to Join